Tuesday, February 28, 2012

Cavins Dresser Redo #1

I was recently given this dresser to redo for my friend's Taylor and Marlena's bedroom.Their bedroom colors are white, gray and yellow. I was a little nervous because I was told this dresser had been in Marlena's family for awhile. The last thing I wanted to do was ruin a possible family heirloom! I thought for a long time about how I wanted to transform this dresser. It was tough because I didn't want it to look too modern, and I felt like that would be easy to do with the colors white gray and yellow. Also, I didn't just want to do white...booooorrrriiinnnggg. So I finally settled on gray. 
As you can see, the dresser was beautiful on it's own, and I loved the details on the drawers.
Here it is after I sanded. There is foil wrapped around the slats that the drawers slide on. I covered them so that spray paint wouldn't get on them and the drawers wouldn't slide as smoothly. 

Here are the drawers after sanding. (p.s. the thing the drawers are resting on is another piece I will be finishing soon...)


Then I primed the dresser and drawers.


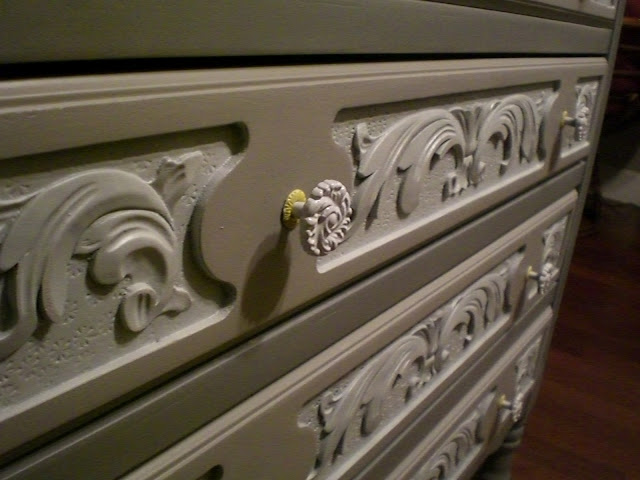
I knew I wanted to make the drawers pop and bring out the pretty details on them but I thought white against the gray might look too modern. So I had a "taupey" shade of gray in a sample size paint can, it was a warmer shade of gray than the body of the dresser would be. I hand painted the drawers without taping anything off! The trick was to use a veeerrryyy small brush and go vveeeeerrryyyy slowly. Here's how they look after hand painting. 


Then I spray painted the body of the dresser gray and coated everything with polyurethane. 


I also spray painted the knobs that came on the dresser with primer and then a white Epoxy which is used for refrigerators and appliances (I thought it would be more durable on the metal than regular spray paint). And I spray painted the base ring of the knobs in a yellow. I wanted to make sure that there was some little pop of yellow somewhere on the dresser and I think this ended up being the perfect touch.


I really like how it turned out.
I will be posting another dresser/dressing table that I am redoing for the Cavins soon so stay tuned!
Love you all!
-Amy 

Thursday, February 9, 2012

The Cavins Guestroom Reveal

Ladies and Gents, it's finally here. The moment I know you have all been waiting for.....the Cavin's guestroom reveal........(drum roll)..........


Taa daaaaa!

Ok so there are alot of pictures, possibly some of the same thing, but I tried to get nearly every angle to give you the best possible "tour" of the room. Enjoy!

This is the view from the doorway of the room.
I hadn't planned on using this cute little table, but when I started setting up the room, this little nook needed something and this table which Taylor and Marlena already had fit perfectly. Plus, it was just the right size for my lighted branch to sit on. Now, I just have to spray paint the table a hammered brown color that will match the room better.

I looovvveee the sconce that hangs above the bed. I found it at Goodwill for $5. Also, the headboard is actually a piece of wrought iron decorative wall art that I found at Marshalls.
Here's the side table I redid all dressed up. A picture of the happy couple in a frame from a thrift store that I spray painted, some flameless candles, and all the books were $1 or $2 each. Books are one of my favorite things to decorate with. I got one from the dollar store (yes, they sell hardback books), and the rest from Half Price Books in the clearance section. Take note that I got the books strictly on color not content. If you ever spend the night in this room at Taylor and Marlena's you will have a variety of reading options from poems to Galileo to How to be your dogs best friend (my personal favorite). 
Here you can see the curtains I made from the fabric I had leftover after I recovered the lampshade.


Here is the crest I made. I got this idea from Pintrest. To see how I did it read my previous post.
They already had the vase and the two extra throw pillows in the basket and they just happen to go well with the room.
Oh yeah, and if you can't tell, both dogs, Lucky and Texas approve of this room :)
Both things I had to buy that are in the picture above, the flower stems and the basket were 50% or more off. Gotta love a good sale!
Here is a view from the opposite side of the room.

The three things on the wall by the door are these really cute hooks with the numbers 1, 2, and 3.


And that's the Cavins Guest Room Tour! I hope you enjoyed it. Love you all!
-Amy 

Monday, February 6, 2012

Pieces for the Cavins room

Well, I have been working on decorating Taylor and Marlena's guest bedroom for a few weeks now, and I am very excited to say that it is finished! However, before I reveal the whole room, I wanted to go through the steps of a few items that went into the room...
This side table ended up in the room. You can see its transformation in my previous post.
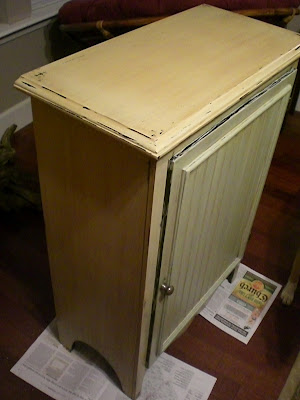
This was a piece that Taylor and Marlena already had  and they weren't using it for anything so I offered to take it and give it a makeover to match the guest room. It's always good to evaluate the pieces you already have first instead of going out and buying a new piece. In this case, the piece was beautiful and ended up working perfectly for the needs of the room. The picture above is after I took the cabinet apart and sanded all the edges and surfaces.  I forgot to take pictures of the steps in between, but I painted the body of the cabinet in a cream color then I distressed the cabinet using a wet washcloth and also a putty knife. I painted the door in a light green color that wasn't too far from the cream color but added a little bit of contrast. I distressed the door as well. Then I decided that it looked too "clean" so I put a stain made of vinegar and steel wool that I just happened to have laying around. The stain was really watery so I put it on, let it sit for a few minutes then got a washcloth and lightly took some of the stain off and left a light layer of it on. Here were the results:


I also made a lamp for the room. Well, it was a lamp I already had, I just tweaked it. This is the original lamp:
I really liked this lamp as is but it just didn't go with the room I was planning so...I took of the crinkle covering off the lampshade and recovered it with some pretty green lacey fabric I had that matched.
I also had enough of this fabric left to make curtains for the room as well but I didn't take a picture of them. You'll just have to wait until the room reveal to see them :)
I found this great oval frame at Goodwill.
 I got an idea from Pintrest to make a crest with their initial in it and I knew this frame would be perfect when I saw it. So first, I took out the embroidery that was on it and recovered it with this blue fabric which was actually a placemat.
Then I bought a wooden letter "C" for Cavins and painted it a cream color. Once it dried, I spray the back with spray glue and stuck it on. Sidenote: I learned that Elmer's spray glue is no joke! You do not want to hold the object that you are spraying or you will get glue all over your hand and it won't come off with soap or water. For the rest of the afternoon everything I touched was sticking to my hand including my own fingers! Thank goodness for GooGone or that stuff would probably still be on me! 
Okay so I forgot again to take a picture of the finished project on this crest so I guess it's just another thing you'll have to wait and see in the room reveal :)
I'll be posting the Cavin's Guestroom Reveal soon!
Love you all!
-Amy